
“Basic Contouring: A Comprehensive Guide to Sculpting Your Face
Related Articles Basic Contouring: A Comprehensive Guide to Sculpting Your Face
- The Ultimate Guide To Affordable Contouring: Sculpting Your Features Without Breaking The Bank
- Affordable Anti-Aging: Unlocking Timeless Beauty Without Breaking The Bank
- Okay, Here’s A Comprehensive Article On Affordable Mascaras, Targeting A Broad Audience And Aiming For Around 1600 Words.
- Affordable Face Serum
- Okay, Here’s A Comprehensive Article On Affordable Skincare, Aiming For Around 1600 Words, Covering Various Aspects And Providing Practical Tips.
Introduction
On this special occasion, we are excited to explore an engaging topic related to Basic Contouring: A Comprehensive Guide to Sculpting Your Face. Join us as we weave together valuable insights and fresh perspectives to bring a new dimension to your understanding.
Table of Content
Basic Contouring: A Comprehensive Guide to Sculpting Your Face

Contouring, a makeup technique that has taken the beauty world by storm, is all about using shadows and highlights to enhance your facial features and create a more sculpted appearance. While it may seem intimidating at first, mastering the basics of contouring can be a game-changer for your makeup routine. In this comprehensive guide, we’ll break down the fundamentals of contouring, covering everything from choosing the right products to step-by-step application techniques.
Understanding the Basics of Contouring
At its core, contouring is about creating the illusion of shadows on your face. By strategically applying a contour product that is darker than your skin tone, you can create depth and definition, making certain areas appear more recessed and sculpted. This technique is often paired with highlighting, which involves applying a lighter shade to accentuate the high points of your face, further enhancing the contrast and creating a more three-dimensional look.
Benefits of Contouring
Contouring offers a multitude of benefits, including:
- Enhanced Facial Features: Contouring can help to define your cheekbones, slim your nose, and sharpen your jawline, enhancing your natural features and creating a more sculpted appearance.
- Improved Facial Symmetry: By strategically applying contour, you can create the illusion of symmetry, balancing out any unevenness in your facial structure.
- Slimmer Face: Contouring can visually slim your face by creating shadows that make certain areas appear more recessed.
- More Defined Features: Contouring can add definition to your features, making them appear more prominent and sculpted.
Choosing the Right Contour Products
Selecting the right contour products is crucial for achieving a natural and seamless finish. Here are some factors to consider:
- Formulation: Contour products come in various formulations, including powders, creams, and sticks. Powder contours are generally easier to blend and are suitable for beginners, while cream and stick contours offer more pigmentation and are ideal for those with dry skin.
- Shade: Choose a contour shade that is two to three shades darker than your natural skin tone. Avoid shades that are too warm or orange, as they can look unnatural and muddy. Opt for cool-toned shades that mimic the appearance of natural shadows.
- Finish: Contour products come in matte and shimmer finishes. Matte contours are generally preferred for creating natural-looking shadows, while shimmer contours can be used to add a subtle glow to the skin.

Essential Tools for Contouring
In addition to the right contour products, you’ll also need the right tools to apply them effectively. Here are some essential tools for contouring:

- Contour Brush: A contour brush is a must-have for applying contour products precisely. Look for a brush with angled bristles that fit perfectly into the hollows of your cheeks.
- Blending Brush: A blending brush is essential for seamlessly blending out your contour and creating a natural finish. Opt for a soft, fluffy brush that will diffuse the product without removing it completely.
- Beauty Sponge: A beauty sponge can be used to blend out both cream and powder contours for a seamless and airbrushed finish.
- Small Brush: A small brush can be used to contour the nose and other small areas of the face.
Step-by-Step Guide to Basic Contouring
Now that you have the right products and tools, let’s dive into the step-by-step guide to basic contouring:
- Prep Your Skin: Start by cleansing, moisturizing, and priming your skin. This will create a smooth canvas for your makeup and help your contour last longer.
- Apply Foundation and Concealer: Apply your foundation and concealer as usual, ensuring that your skin is even-toned and free of blemishes.
-
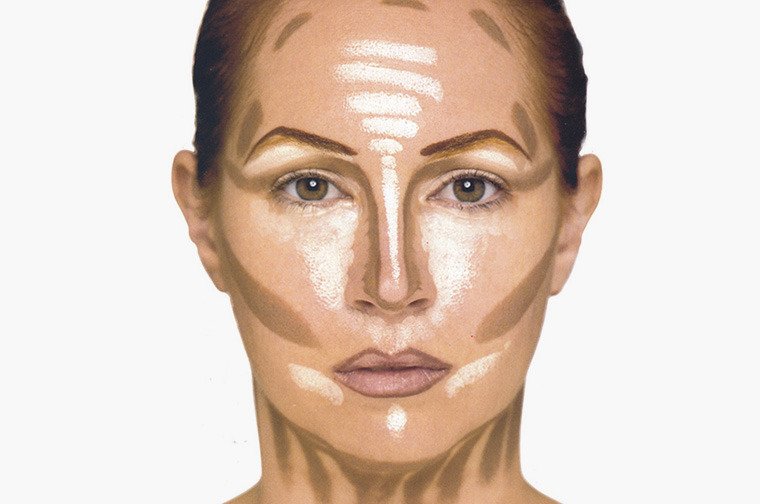
Identify Your Contour Areas: Before you start applying contour, it’s important to identify the areas where you want to create shadows. These areas typically include:
- Hollows of Your Cheeks: To find the hollows of your cheeks, suck in your cheeks and feel for the indentation below your cheekbones.
- Temples: Applying contour to your temples can help to narrow your forehead and create a more balanced facial shape.
- Jawline: Contouring your jawline can help to define your jaw and create a more sculpted appearance.
- Sides of Your Nose: Contouring the sides of your nose can help to slim and define your nose.
-
Apply Contour: Using your contour brush, apply your contour product to the identified areas. Start with a light hand and build up the intensity as needed.
- Cheeks: Apply contour to the hollows of your cheeks, starting from your ear and blending towards the center of your face.
- Temples: Apply contour to your temples, blending upwards towards your hairline.
- Jawline: Apply contour along your jawline, blending downwards towards your neck.
- Nose: Apply contour to the sides of your nose, blending downwards towards your nostrils.
- Blend, Blend, Blend: Blending is key to achieving a natural and seamless contour. Use your blending brush or beauty sponge to blend out the contour, ensuring that there are no harsh lines or edges.
- Apply Highlight: To further enhance your contour, apply a highlighter to the high points of your face, such as your cheekbones, brow bone, and the bridge of your nose.
- Set Your Makeup: To ensure that your contour lasts all day, set your makeup with a setting powder or spray.
Contouring Tips for Different Face Shapes
The placement of your contour can vary depending on your face shape. Here are some contouring tips for different face shapes:
- Oval Face: Oval faces are considered to be the most balanced face shape, so you can contour along your cheekbones, temples, and jawline to enhance your natural features.
- Round Face: To slim a round face, contour along your cheekbones, temples, and jawline, focusing on creating sharp angles.
- Square Face: To soften a square face, contour along your temples and jawline, rounding out the edges.
- Heart-Shaped Face: To balance a heart-shaped face, contour along your temples and the tip of your chin.
- Long Face: To shorten a long face, contour along your hairline and the bottom of your chin.
Common Contouring Mistakes to Avoid
To avoid common contouring mistakes, keep the following tips in mind:
- Choosing the Wrong Shade: Avoid shades that are too warm or orange, as they can look unnatural and muddy.
- Applying Too Much Product: Start with a light hand and build up the intensity as needed.
- Not Blending Enough: Blending is key to achieving a natural and seamless contour.
- Contouring in the Wrong Areas: Identify your contour areas based on your face shape.
- Using the Wrong Tools: Use the right brushes and sponges to apply and blend your contour effectively.
Conclusion
Contouring is a versatile makeup technique that can enhance your facial features and create a more sculpted appearance. By understanding the basics of contouring, choosing the right products and tools, and following the step-by-step guide, you can master this technique and achieve a flawless, sculpted look. Remember to practice and experiment to find the contouring techniques that work best for your face shape and features. With a little patience and practice, you’ll be contouring like a pro in no time.

Closing
With that, we hope this article has provided valuable insights into Basic Contouring: A Comprehensive Guide to Sculpting Your Face. Thank you for taking the time to read this article. See you in our next article!

