
“Basic Makeup: A Beginner’s Guide to a Flawless Face
Related Articles Basic Makeup: A Beginner’s Guide to a Flawless Face
- Affordable Face Serum
- Affordable Daily Glam: Elevate Your Everyday Look Without Breaking The Bank
- Affordable Anti-Aging: Unlocking Timeless Beauty Without Breaking The Bank
- Basic Beauty Trends: Mastering The Essentials For A Timeless Glow
- The Ultimate Beginner’s Guide To A Simple & Effective "Get Ready With Me" Routine
Introduction
With great enthusiasm, we’re diving into an engaging topic related to Basic Makeup: A Beginner’s Guide to a Flawless Face. Let’s weave together valuable insights and fresh perspectives to bring a new dimension to your understanding.
Table of Content
Basic Makeup: A Beginner’s Guide to a Flawless Face

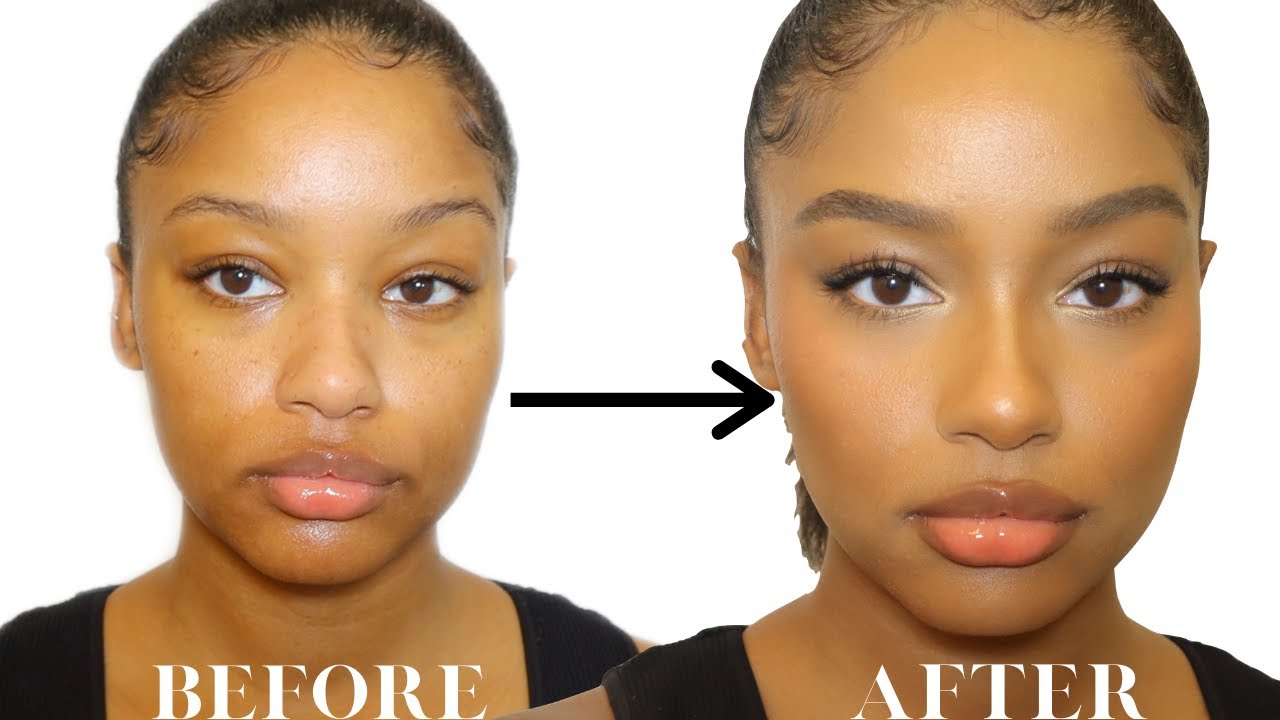
Makeup, at its core, is a tool for enhancing your natural beauty and boosting your confidence. While the world of cosmetics can seem overwhelming with its endless products and techniques, mastering the basics is the key to achieving a polished and radiant look. This guide will walk you through the essential steps of a basic makeup routine, providing product recommendations and tips for achieving a flawless finish.
1. Skincare: The Foundation of Beautiful Makeup
Before you even think about makeup, remember that healthy, well-cared-for skin is the best canvas. A consistent skincare routine will not only improve your complexion but also make your makeup look smoother and last longer.
- Cleansing: Start with a gentle cleanser to remove dirt, oil, and makeup residue. Choose a cleanser appropriate for your skin type (e.g., foaming for oily skin, cream-based for dry skin).
- Toning: Toner helps balance your skin’s pH levels and prep it for better absorption of subsequent products. Look for alcohol-free toners to avoid dryness.
- Moisturizing: Moisturizer is essential for hydration, regardless of your skin type. Choose a lightweight, non-comedogenic moisturizer for oily skin and a richer, more hydrating formula for dry skin.
- Sunscreen: This is non-negotiable! Protect your skin from harmful UV rays with a broad-spectrum sunscreen with an SPF of 30 or higher. Apply it as the last step in your skincare routine, before makeup.
2. Priming: Creating a Smooth Canvas
Primer is a makeup base that creates a smooth surface for foundation and helps it adhere better to the skin. It can also address specific skin concerns, such as minimizing pores, controlling oil, or adding hydration.
- Choosing the Right Primer:
- Oily Skin: Look for mattifying primers with ingredients like silica or clay to control shine.
- Dry Skin: Opt for hydrating primers with ingredients like hyaluronic acid or glycerin.
- Large Pores: Use a pore-filling primer to create a smoother surface.
- Redness: Choose a color-correcting primer with a green tint to neutralize redness.
- Application: Apply a small amount of primer to your face, focusing on areas where you experience the most issues (e.g., T-zone, cheeks). Use your fingertips or a makeup sponge to blend it evenly into your skin.
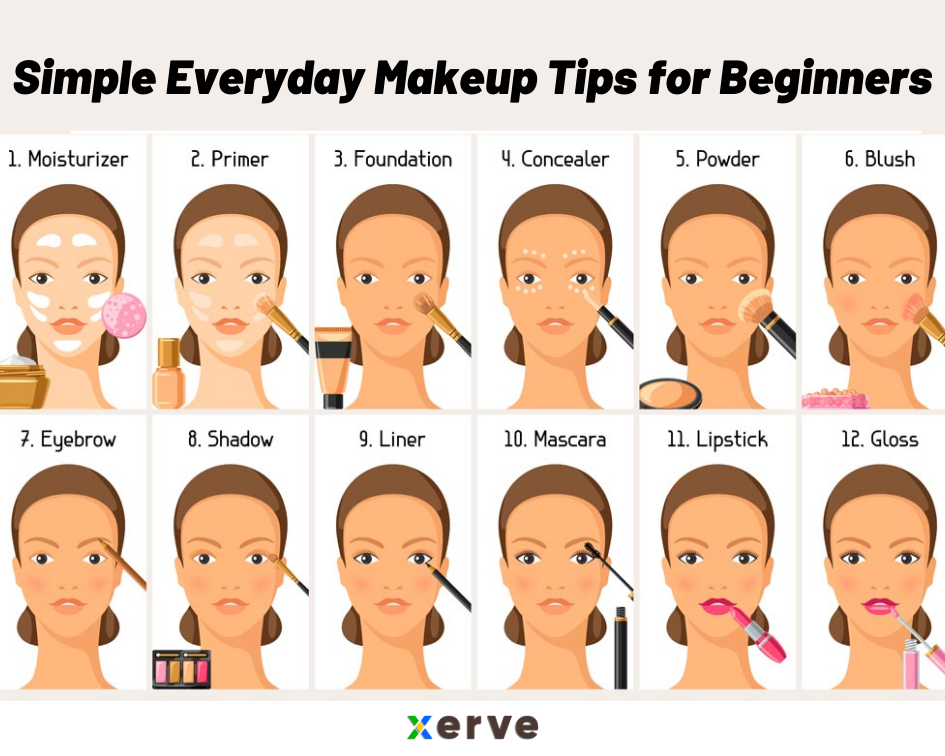
3. Foundation: Achieving an Even Skin Tone
Foundation is used to even out your skin tone, conceal imperfections, and create a smooth base for the rest of your makeup.
- Choosing the Right Foundation:
- Coverage:
- Sheer: Provides minimal coverage, ideal for those with relatively clear skin.
- Medium: Offers buildable coverage, suitable for most skin types.
- Full: Provides maximum coverage, best for concealing significant imperfections.
- Finish:
- Matte: Shine-free finish, ideal for oily skin.
- Dewy: Luminous, radiant finish, suitable for dry skin.
- Satin: A balanced finish that’s not too matte or too dewy, suitable for most skin types.
- Formulation:
- Liquid: Versatile and easy to blend, available in various coverage levels and finishes.
- Cream: Provides more hydration, ideal for dry skin.
- Powder: Best for oily skin, provides a matte finish.
- Finding Your Shade: The best way to find your perfect foundation shade is to test it on your jawline in natural light. The shade should disappear into your skin without leaving a visible line.
- Coverage:
- Application:
- Tools: You can apply foundation with a makeup sponge, brush, or your fingertips.
- Technique: Start by applying a small amount of foundation to the center of your face and blend outwards towards your hairline and jawline. Use light, even strokes to avoid streaks.
- Building Coverage: If you need more coverage in certain areas, apply a second layer of foundation to those spots.
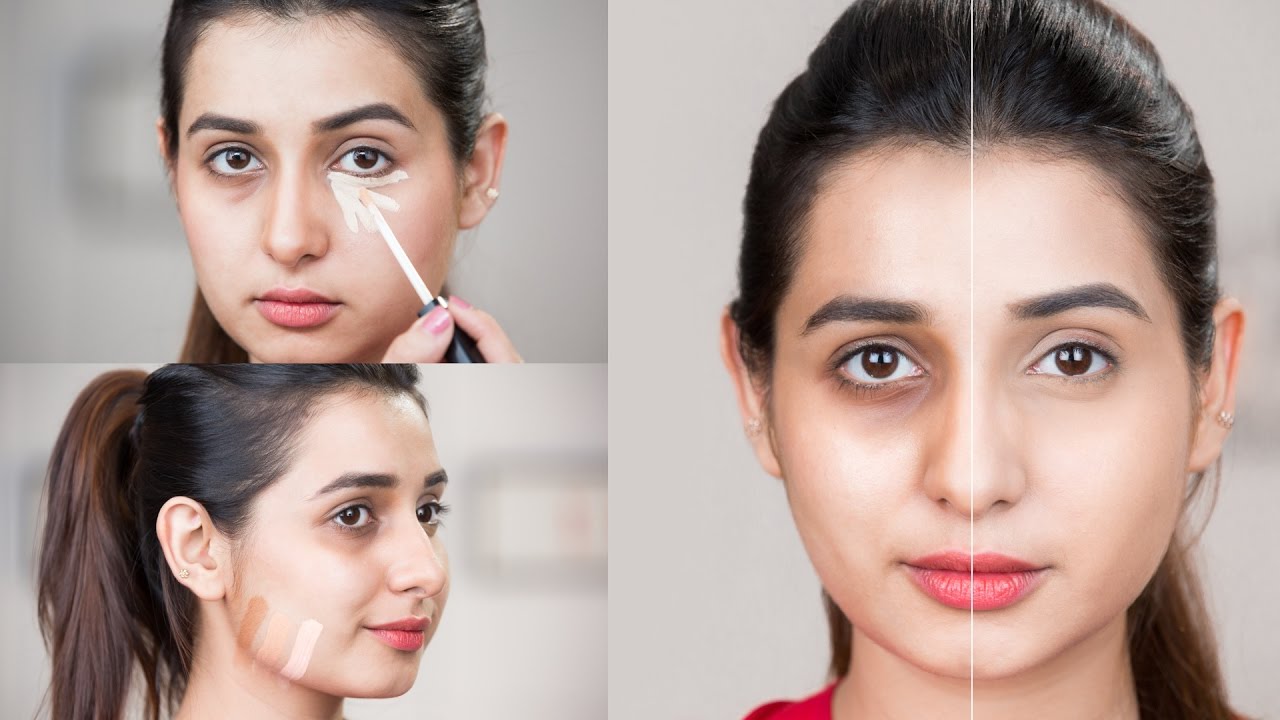
4. Concealer: Hiding Imperfections
Concealer is used to brighten the under-eye area, conceal blemishes, and cover up any remaining imperfections that foundation couldn’t handle.
- Choosing the Right Concealer:
- Under-Eye Concealer: Choose a concealer that is one or two shades lighter than your skin tone to brighten the under-eye area. Look for a creamy, hydrating formula to avoid creasing.
- Blemish Concealer: Choose a concealer that matches your skin tone exactly to avoid drawing attention to the blemish. Look for a thicker, more pigmented formula for better coverage.
- Application:
- Under-Eye: Apply concealer in an inverted triangle shape under your eyes, blending it outwards towards your cheekbones.
- Blemishes: Dab concealer directly onto the blemish and blend the edges outwards.
5. Setting Powder: Locking Everything in Place
Setting powder is used to set your foundation and concealer, prevent creasing, and control shine.
- Choosing the Right Setting Powder:
- Loose Powder: Provides a more lightweight, natural finish.
- Pressed Powder: More convenient for on-the-go touch-ups.
- Translucent Powder: Colorless, suitable for all skin tones.
- Tinted Powder: Provides a bit of extra coverage.
- Application:
- Tools: Use a large, fluffy brush for all-over application or a smaller brush for targeted areas.
- Technique: Dip your brush into the powder, tap off the excess, and gently press the powder onto your face, focusing on areas that tend to get oily (e.g., T-zone, under-eye area).
6. Bronzer: Adding Warmth and Dimension
Bronzer is used to add warmth and dimension to your face, creating a sun-kissed glow.
- Choosing the Right Bronzer:
- Shade: Choose a bronzer that is one or two shades darker than your skin tone. Avoid bronzers that are too orange or too shimmery.
- Finish: Matte bronzers are more natural-looking, while shimmer bronzers can add a subtle glow.
- Application:
- Tools: Use a large, angled brush.
- Technique: Apply bronzer to the areas where the sun naturally hits your face: your forehead, cheekbones, and jawline. Blend well to avoid harsh lines.
7. Blush: Adding a Pop of Color
Blush is used to add a pop of color to your cheeks, creating a healthy, youthful glow.
- Choosing the Right Blush:
- Shade: Choose a blush shade that complements your skin tone.
- Fair Skin: Light pinks, peaches, and corals.
- Medium Skin: Rosy pinks, berries, and mauves.
- Dark Skin: Deep berries, plums, and oranges.
- Formulation:
- Powder: Versatile and easy to blend.
- Cream: Provides a more dewy, natural finish.
- Gel/Liquid: Long-lasting and blendable.
- Shade: Choose a blush shade that complements your skin tone.
- Application:
- Tools: Use a blush brush.
- Technique: Smile to find the apples of your cheeks, and apply blush to those areas. Blend upwards towards your temples.
8. Eyeshadow: Defining Your Eyes
Eyeshadow is used to define your eyes and add depth and dimension to your look.
- Choosing the Right Eyeshadow:
- Neutral Shades: Brown, beige, and taupe are versatile and can be used to create a variety of looks.
- Shimmer Shades: Can add a touch of sparkle to your eyes.
- Matte Shades: Provide a more natural, understated look.
- Application:
- Tools: Use eyeshadow brushes.
- Technique:
- Base Shade: Apply a neutral shade all over your eyelid, from your lash line to your brow bone.
- Crease Shade: Apply a slightly darker shade to your crease to add depth.
- Lid Shade: Apply a shimmer or matte shade to your eyelid.
- Highlight Shade: Apply a light, shimmery shade to your brow bone and inner corner of your eye to highlight.
9. Eyeliner: Defining Your Lash Line
Eyeliner is used to define your lash line and make your eyes appear larger and more defined.
- Choosing the Right Eyeliner:
- Pencil Eyeliner: Easy to use and blend, ideal for beginners.
- Liquid Eyeliner: Provides a more precise line, but requires a steady hand.
- Gel Eyeliner: Long-lasting and smudge-proof, can be applied with a brush.
- Application:
- Technique: Start by drawing a thin line along your upper lash line, as close to your lashes as possible. You can create a wing at the outer corner of your eye for a more dramatic look.
10. Mascara: Lengthening and Volumizing Your Lashes
Mascara is used to lengthen, volumize, and define your lashes.
- Choosing the Right Mascara:
- Lengthening Mascara: Adds length to your lashes.
- Volumizing Mascara: Adds thickness to your lashes.
- Waterproof Mascara: Smudge-proof and long-lasting.
- Application:
- Technique: Start by curling your lashes with an eyelash curler. Then, apply mascara to your upper and lower lashes, wiggling the wand at the base of your lashes to coat them evenly.
11. Eyebrows: Framing Your Face
Eyebrows frame your face and can make a big difference in your overall look.
- Filling in Your Eyebrows:
- Tools: Use an eyebrow pencil, powder, or gel.
- Technique: Fill in any sparse areas of your eyebrows with light, feathery strokes. Follow the natural shape of your eyebrows and avoid making them too dark or too thick.
- Setting Your Eyebrows:
- Tools: Use an eyebrow gel.
- Technique: Brush your eyebrows upwards with an eyebrow gel to set them in place.
12. Lipstick: Completing Your Look
Lipstick is used to add color and definition to your lips, completing your makeup look.
- Choosing the Right Lipstick:
- Shade: Choose a lipstick shade that complements your skin tone and your overall makeup look.
- Finish:
- Matte: Long-lasting and provides a bold, statement look.
- Cream: Hydrating and comfortable to wear.
- Glossy: Adds shine and makes your lips appear fuller.
- Application:
- Technique: Start by lining your lips with a lip liner that matches your lipstick shade. Then, apply lipstick to your lips, starting from the center and working your way outwards.
13. Setting Spray: Ensuring Longevity
Setting spray is the final touch, helping to meld all the products together and extend the wear of your makeup.
- Types:
- Hydrating: For dry skin, adds moisture.
- Mattifying: For oily skin, controls shine.
- All-Purpose: Suitable for most skin types.
- Application: Hold the bottle about 8-10 inches from your face and spray in an "X" and "T" motion to cover all areas.
Tips for Beginners:
- Start Simple: Don’t try to do too much at once. Focus on mastering the basics first.
- Less is More: It’s always better to start with a small amount of product and build up coverage as needed.
- Blend, Blend, Blend: Blending is key to achieving a natural-looking finish.
- Practice Makes Perfect: The more you practice, the better you’ll become at applying makeup.
- Clean Your Brushes Regularly: Dirty brushes can harbor bacteria and lead to breakouts.
Product Recommendations (Examples):
- Cleanser: CeraVe Hydrating Facial Cleanser
- Moisturizer: Neutrogena Hydro Boost Water Gel
- Sunscreen: EltaMD UV Clear Broad-Spectrum SPF 46
- Primer: Smashbox Photo Finish Foundation Primer
- Foundation: Maybelline Fit Me Matte + Poreless Foundation
- Concealer: NARS Radiant Creamy Concealer
- Setting Powder: Laura Mercier Translucent Loose Setting Powder
- Bronzer: Benefit Hoola Matte Bronzer
- Blush: Milani Baked Blush
- Eyeshadow Palette: Urban Decay Naked Basics Eyeshadow Palette
- Eyeliner: Stila Stay All Day Waterproof Liquid Eyeliner
- Mascara: Maybelline Lash Sensational Mascara
- Eyebrow Pencil: Anastasia Beverly Hills Brow Wiz
- Lipstick: MAC Matte Lipstick
- Setting Spray: Urban Decay All Nighter Setting Spray
By following these steps and practicing regularly, you’ll be well on your way to mastering the art of basic makeup and achieving a flawless, confident look. Remember, makeup is a tool to enhance your natural beauty, so have fun and experiment to find what works best for you!

Closing
With that, we hope this article has provided valuable insights into Basic Makeup: A Beginner’s Guide to a Flawless Face. We hope you found this article both informative and helpful. See you in our next article!

