.jpg?w=1024&resize=1024,1024&ssl=1 "Easy Makeup Brushes")
“easy makeup brushes
Related Articles easy makeup brushes
- DIY Anti-Aging: Unlocking Youthful Radiance With Natural Remedies
- Budget-Friendly Eyeliners: Achieve Stunning Looks Without Breaking The Bank
- Affordable Daily Glam: Elevate Your Everyday Look Without Breaking The Bank
- Clear Skin Beauty Hacks: Your Ultimate Guide To A Radiant Complexion
- Chic Beauty: Unveiling Timeless Elegance With Modern Flair
Introduction
We’re thrilled to take a closer look at an engaging topic related to easy makeup brushes. Join us as we weave together valuable insights and fresh perspectives to bring a new dimension to your understanding.
Table of Content
Okay, here’s a comprehensive article on easy makeup brushes, designed to be informative, helpful, and approachable for a wide range of readers. I’ve aimed for a length around 1600 words.
.jpg "Easy Makeup Brushes")
Easy Makeup Brushes: Your Guide to Flawless Application (Without the Fuss!)
For many, the world of makeup can feel overwhelming, especially when faced with a seemingly endless array of brushes. From fluffy domes to angled precision tools, understanding which brush does what can be a daunting task. But fear not! Achieving a flawless makeup look doesn’t require a professional-level kit or years of experience. This guide will demystify the world of makeup brushes, focusing on the essential, easy-to-use tools that will help you elevate your makeup game without the confusion. We’ll explore the must-have brushes, how to choose the right ones for your needs, proper cleaning techniques, and tips for using them effectively.
Why Use Makeup Brushes?
Before diving into the specifics, let’s address the fundamental question: why bother with brushes at all? While fingers and sponges can certainly be used for makeup application, brushes offer several key advantages:
- Precision: Brushes allow for more precise application, especially in areas like the crease of the eye, along the lash line, and around the nose. This precision leads to a more polished and professional finish.
- Blending: Brushes are designed to seamlessly blend makeup, creating a smooth and natural look. They help to avoid harsh lines and streaks, which can be difficult to achieve with fingers or sponges alone.
- Coverage: Brushes can provide more even coverage than fingers, distributing product evenly across the skin. This is particularly important for foundation, concealer, and powder.
- Hygiene: While fingers can introduce bacteria to your makeup products and skin, clean brushes offer a more hygienic application method.
- Product Control: Brushes allow you to control the amount of product you use, minimizing waste and preventing a cakey or heavy look.
- Enhanced Texture: Different brush types can enhance the texture of your makeup. For example, a stippling brush can create an airbrushed effect with foundation.
The Essential Makeup Brushes for Beginners (and Beyond)
To keep things simple, let’s focus on the core brushes that will cover most makeup application needs. You don’t need a huge collection to achieve a beautiful look.
-
Foundation Brush:
- Purpose: Applying and blending foundation.
- Types:

- Flat Foundation Brush: Offers full coverage and is ideal for cream or liquid foundations. Apply the foundation in dots across your face and then use the brush to blend outward.
- Round/Buffing Foundation Brush (Kabuki): Provides medium to full coverage and is great for blending foundation seamlessly. Use circular motions to buff the foundation into the skin.
- Stippling Brush: Creates a light, airbrushed finish. Use a bouncing motion to apply foundation.
- Material: Synthetic bristles are generally preferred for liquid and cream foundations as they don’t absorb as much product.
- Easy Choice: A round/buffing foundation brush is a versatile option for beginners.
-
Concealer Brush:
- Purpose: Applying and blending concealer to cover blemishes, dark circles, and imperfections.
- Types:
- Small, Flat Brush: Ideal for precise application of concealer to small areas like blemishes.
- Tapered Blending Brush: Excellent for blending concealer under the eyes and around the nose.
- Material: Synthetic bristles are best for cream and liquid concealers.
- Easy Choice: A small, flat brush provides targeted coverage.
-
Powder Brush:
- Purpose: Applying loose or pressed powder to set makeup and control shine.
- Types:
- Large, Fluffy Brush: Perfect for applying powder to the entire face.
- Angled Powder Brush: Good for applying powder to specific areas like the T-zone.
- Material: Natural bristles are often preferred for powder as they pick up and distribute product evenly. However, high-quality synthetic brushes also work well.
- Easy Choice: A large, fluffy brush is a classic and versatile option.
-
Blush Brush:
- Purpose: Applying blush to the cheeks.
- Types:
- Angled Blush Brush: Provides precise application and helps to sculpt the cheeks.
- Round Blush Brush: Blends blush seamlessly for a natural flush.
- Material: Natural or synthetic bristles can be used.
- Easy Choice: An angled blush brush is great for contouring and precise placement.
-
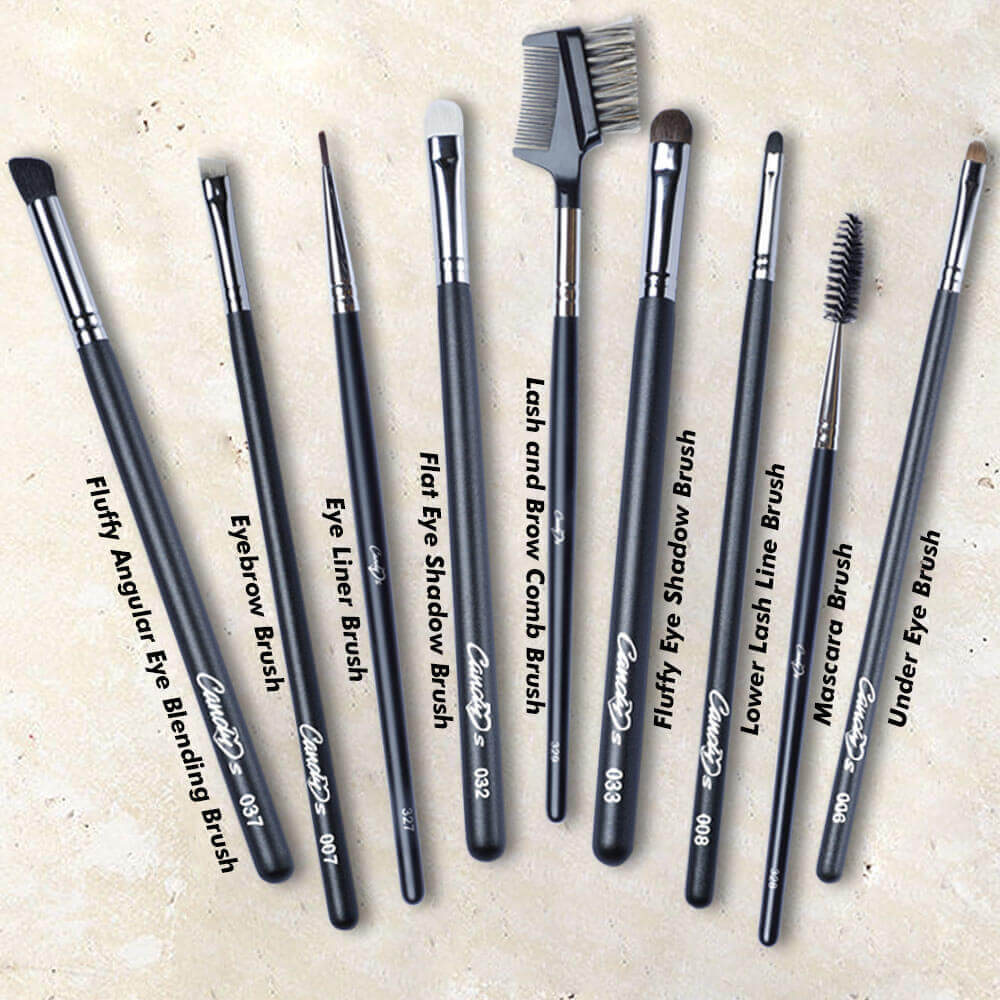
Eyeshadow Brushes:
- Purpose: Applying and blending eyeshadow. A few basic brushes can create a variety of looks.
- Types:
- Flat Shader Brush: For packing color onto the eyelid.
- Blending Brush: For blending eyeshadow in the crease and softening edges. Look for a fluffy, tapered brush.
- Pencil Brush: For precise application of eyeshadow in the crease, along the lash line, or to highlight the inner corner of the eye.
- Material: Natural bristles are generally preferred for blending, while synthetic bristles can be used for applying cream shadows.
- Easy Choice: A flat shader brush and a blending brush are essential for creating basic eyeshadow looks.
-
Eyebrow Brush:
- Purpose: Filling in and shaping eyebrows.
- Types:
- Angled Brow Brush: For applying powder or pomade to fill in the brows.
- Spooley Brush: For blending and grooming eyebrow hairs.
- Material: Synthetic bristles are ideal for applying brow products.
- Easy Choice: An angled brow brush and a spooley brush are a powerful combination.
-
Lip Brush:
- Purpose: Applying lipstick with precision and control.
- Types:
- Small, Firm Brush: For outlining and filling in the lips.
- Material: Synthetic bristles are best for lip products.
- Easy Choice: A small, firm lip brush can help create a defined lip line.
Choosing the Right Brushes: Key Considerations
- Bristle Type:
- Natural Bristles: Made from animal hair (e.g., goat, squirrel, pony). They are porous and excel at picking up and distributing powder products. They are also excellent for blending.
- Synthetic Bristles: Made from nylon or other synthetic materials. They are non-porous, making them ideal for liquid and cream products. They are also easier to clean and more hygienic, and cruelty-free.
- Brush Shape: The shape of the brush dictates its purpose and how it applies product. Consider the specific areas of your face you want to target and the type of makeup you’ll be using.
- Handle Length and Material: Choose a handle that feels comfortable in your hand and provides good control. Handles can be made from wood, plastic, or metal.
- Brush Density: Densely packed brushes will pick up more product and provide fuller coverage, while less dense brushes will provide a lighter, more diffused application.
- Budget: Makeup brushes range in price from very affordable to quite expensive. You don’t need to break the bank to get good quality brushes. Start with a few essential brushes and gradually build your collection.
Cleaning Your Makeup Brushes: A Must-Do for Hygiene and Performance
Cleaning your makeup brushes regularly is crucial for several reasons:
- Hygiene: Dirty brushes can harbor bacteria, which can lead to breakouts and skin irritation.
- Performance: Clean brushes apply makeup more smoothly and evenly. Product buildup can stiffen the bristles and affect their ability to blend.
- Brush Longevity: Regular cleaning helps to extend the lifespan of your brushes.
How to Clean Your Makeup Brushes:
- Daily Spot Cleaning (Optional): Use a brush cleaner spray or wipes to remove excess product after each use.
- Deep Cleaning (Weekly or Bi-Weekly):
- Wet the Bristles: Hold the brush bristles downward under lukewarm running water. Avoid getting water on the handle, as this can loosen the glue that holds the bristles in place.
- Apply Cleanser: Use a gentle shampoo, brush cleanser, or mild soap to clean the bristles.
- Swirl and Rinse: Gently swirl the brush in the palm of your hand or on a textured cleaning mat to create a lather. Rinse thoroughly under running water until the water runs clear.
- Reshape: Gently squeeze out excess water and reshape the bristles with your fingers.
- *Dry:** Lay the brushes flat on a clean towel or hang them upside down to dry. Avoid drying them upright, as this can cause water to seep into the handle and loosen the glue.
Tips for Using Makeup Brushes Effectively:
- Start with a Light Hand: It’s always easier to add more product than to remove it.
- Use Circular Motions for Blending: This helps to create a seamless and natural finish.
- Tap Off Excess Product: Before applying product to your face, tap off any excess from the brush to prevent a heavy or cakey look.
- Clean Your Brushes Regularly: This will help to keep your skin healthy and your brushes performing their best.
- Experiment: Don’t be afraid to experiment with different brushes and techniques to find what works best for you.
- Watch Tutorials: Online tutorials can be a great resource for learning new brush techniques.
Beyond the Basics: Expanding Your Brush Collection
Once you’ve mastered the essential brushes, you can start to explore more specialized tools, such as:
- Contour Brush: For sculpting and defining the cheekbones, jawline, and nose.
- Highlight Brush: For applying highlighter to the high points of the face.
- Fan Brush: For applying a light dusting of powder or highlighter.
- Crease Brush: A more precise crease brush for detailed eyeshadow work.
Conclusion:
Mastering makeup application doesn’t require a complicated arsenal of brushes. By focusing on a few essential, easy-to-use tools and practicing proper techniques, you can achieve a flawless and professional-looking makeup look. Remember to choose brushes that suit your needs and preferences, clean them regularly, and experiment to find what works best for you. With a little practice and patience, you’ll be amazed at the difference that the right brushes can make! Good luck and happy blending!

Closing
With that, we hope this article has provided valuable insights into easy makeup brushes. We appreciate your interest in our content. See you in our next article!

